|
DIY TOWED HYDROPHONE
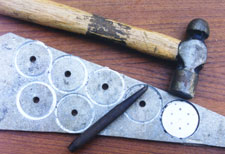
The photo below shows my own version of a towing
hydrophone, which I feel has some practical advantages over Watlington's
similar design.
Design Features
a) Most components can be cut from aluminium plate with a hole
saw (candle wax or automatic transmission fluid help prevent aluminium
galling onto hole saw teeth) and machined using a small lathe, or perhaps
even a drill press. Aluminium is easily worked with hand woodworking
tools, although a small lathe makes a quicker and neater job. I also used a 10mm
end mill in a drill press to cut the recesses.
b) The design provides a reusable, low profile clamping and sealing system,
avoiding the need for proprietary band clamping equipment. The length of the
flexible tube can be varied to suit the number and spacing of elements in the
array, although a single element is all that's needed for general listening.
c) There is separate anchoring for cable shielding braid and an external rope
braid. The rope braid is not essential but takes the towing load and helps
protects ordinary microphone or coaxial transmission cable. Professional
armoured cable is very expensive.
d) The cable is sealed by compression of rubber washers rather than using
O-rings.
Building this hydrophone does require some skill with hand and power tools.
If you'd like to discuss any aspect of this project you might email me.
If you're not into building such gear for yourself, or
want to buy some of the components - hydrophone transducers, preamplifiers, and
complete dunking hydrophones can be purchased from various sources.
Sensor Technologies are one firm
that carries many types and I've found them helpful and easy to deal with.
They will airmail lightweight components for example, instead of insisting on
using expensive international couriers.
TOWING HYDROPHONE

This hydrophone is intended for towing below the surface
behind a sailing yacht. The longer the tow and the faster the yacht, the more
cable friction noise will be present, but if too short it will pick up the sound
of the moving yacht. Motor boats may need very long tows to escape their
propeller and engine noises, but under light conditions and speeds below 5 knots
a sailing yacht may get quite good results with less than 10m.
The piezo transducer element and preamplifier circuit
are the same as for the dunking hydrophone, but
housed within a flexible clear PVC tube, filled with vegetable oil. The
tube is sealed with a
nose cone and a tail cone. The
nose cone also provides for entry of the electrical cable and anchoring of the
towing load. The tail cone incorporates a hole through which oil is added and
air removed. The threaded bung for this hole also provides attachment for a
stabilising rope trailing behind the hydrophone.
More compact "encapsulated" designs are of course possible,
and more elegant housings of this re-sealable type can also be built
professionally. However this DIY arrangement suits low cost amateur
experimentation because the elements and electronics can be accessed, and the
construction does not require sophisticated tools.
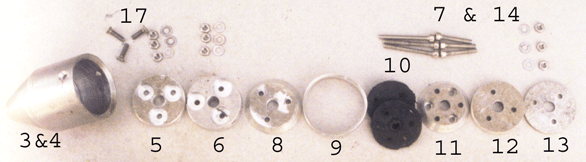
Nose Cone Details
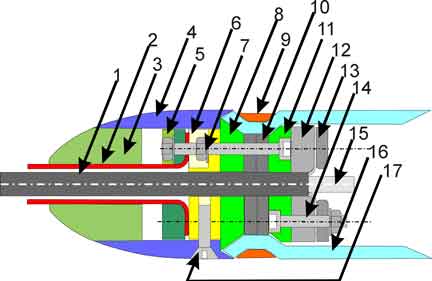
NOTE: Material
marine/construction grade aluminium (e.g. plate 5086, 5251, 5083, tubes 6061,
6261, 6351) except where indicated. Dimensions in millimeters - vary to
suit available/chosen cable, rope, PVC tube, and fasteners. RH1 = Recessed Hole,
7 diameter x 3.3 deep to suit M3 cap screw heads. RH2 = Recessed Hole 10
diameter x 3 deep to suit M3 nut socket spanner. PCD = Pitch Circle Diameter for
centers of holes, dia= diameter. M3 = Metric 3mm thread size. Holes for items
7&14 rotated 60 degrees from each other. Csk= countersunk.
1)Shielded Cable <7mm
2)Rope Braid <10mm
3)Nose Insert - epoxy glue to #4 (or machine from one solid piece)
4)Tube 38x31.5
5)Rope Clamp 31.4 x6, 3 RH2, equispaced 18 PCD
6)Nose Plate 31.4 x 8, 3 RH2 equispaced 18 PCD
7)M3 Stainless Cap screws, 3 @3x30, 6 nuts & 9 washers
8)Front Squash Plate 34x6x30deg chamfer, 3 holes equispaced 18 PCD
9)Ring 37x34, 2 x 30 deg chamfers
(Cut from aluminium tube)
10)Rubber (truck tire tube) Washers 2 or 3 @ ~28x3
11)Back Squash Plate ~31x6, 6
M3 threaded holes equispaced 18 PCD, RH1 alternating sides 2 x8 central recess.
Chamfer one edge from 28mm x 30 deg.
12)Follower Plate 30x6, 6 holes 3.1 equispaced @18mm
13)Shielding Clamp 30x3, 3
holes 3.1, equispaced @18 PCD, 9 dia central hole
14)M3 Stainless Cap Screws 3@ 3x ~20, 3 nuts & 6 washers
15)Insulated Electrical
Conductors
16)Flexible Clear PVC Hose ~38 dia x3 wall (nominal 1.5")
17)M3 Csk Machine Screws 3 @ 3 x 9, equispaced. Tapped holes in item 6.
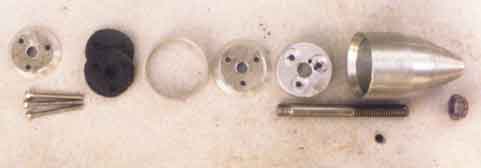
Tail Cone Details
Tail cone uses the same system as the nose cone for connecting the tube to the
cone, and doesn't need the braid and shielding clamps. Other differences are
detailed below. More sophisticated fill seal arrangements are possible, but just
screwing the tapered M8 thread works satisfactorily.
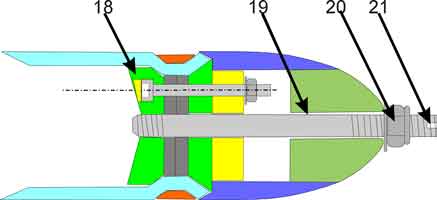
18) Back Squash Plate ~31x6 (or
x10 if side facing oil is conical as shown , to facilitate bubble
removal). 3 M3 threaded holes equispaced 18 PCD. Recess M3 heads and
fill flush with epoxy. Chamfer one edge from 28mm x 30 deg. M8 threaded hole in
centre.
19) M8 stainless bolt with head removed. Tapered M8 thread at ex-head end.
(taper the thread depth, not the bolt diameter). A longer bolt than shown (or a
section of threaded rod) will prove convenient if a stabilising rope needs to be
attached to stream behind the hydrophone. This may be necessary if the
hydrophone tends to shear around or rotate, as it may if the plastic tube for
example is not perfectly straight.
20) Stainless M8 Nyloc nut and washer to secure tail cone
21) Screwdriver slot in end of #19
Construction Tips
1) The only parts that requires even vaguely accurate machining or
alignment are the holes for the three small bolts. Mark these out on a piece of
paper, transfer them to each disk using a centre punch, and match mark in case
the centers are slightly different. It may be easier to part cut the disks, then
mark and drill the small holes, then finish cutting the disks from the other
side of the plate. To machine the disk components down to exact size, grip the
disk through the central hole, using a bolt with 2 washers and a nut. Then
grip the protruding end of the bolt in the drill press or lathe chuck.
2) If plastic tube is curved from roll storage, plug one end and tape to a
straight vertical object. Fill with very hot water and allow to cool. Cut
tube ends square. Before adding the electronics, trial assemble with hot water
to pre-deformed the tube ends to accept items 8,9,&11.
3) After final assembly, slightly warm the vegetable oil (not hot!) before
filling tube. Allow to stand vertically so that bubbles escape - squeeze tube to
encourage air bubbles to rise - top up and screw in the bung.
4) Replacing the core of a long length of braided rope with electrical cable is
more difficult than might be thought. Use only brand new rope, lubricate the
cable with silicone sail-slide spray, and avoid dirt pick-up on the cable.
Attach one end of core to a strong point and attach other end to cable, paying
careful attention to making a strong, smooth joint between core and cable,
without hollows or bumps. Mark the rope at one meter intervals and then
systematically slacken the outer braid, reducing each marked segment by say 50mm
using your hands to smooth it along, starting from both ends and progressing
towards the middle of the rope. As each meter interval is slackened, apply
reinforced packaging tape to that interval of braid, to prevent it moving
or bunching up and grabbing the core. Finally work braid off its core and
onto the cable. Remove the tape. This system works for me, but I don't pretend
it's an easy job, so if you want to skip this step and use the cable without the
rope sheathing go ahead - with luck it will last plenty long enough without it.
5) Do not over-tighten the M3 fasteners or they will break. Because the tube is
flexible there is no hydrostatic pressure difference - the objective is just to
seal in the oil and secure the cones to the tube.
Return to top of this page
|